Click HERE to return to the contents page
III. SALES – A/R [Time: 69:36 min.]
Sales process [Time: 43:11 min.]
Image that: Your company has set customer satisfaction as its top priority and wants to streamline processes in sales to ensure that customer demands can be as quickly as possible.
Sales Order > Delivery > A/R Invoice > Incoming Payment
The sale-A/R process moves from selling the goods (and services) to delivering those goods to invoicing the customer for their purchases, to the last step in accounting of receiving the Incoming Payment.
Each step in the sales process involves a document, such as Sales Order, Delivery, or A/R Invoice.
SAP Business One efficiently moves all relevant information from one document in the next in the document flow.
According to the business needs, you can choose which documents to include as your process steps.
The only mandatory document in sales in the A/R Invoice. [mandatory = must created]
This topic helps you recognize what is the same in each document so that you quickly focus on just the information you need.
Sales documents carry much of the same information throughout the sales process.
Note that ou also have the option to use a Sales Quotation to start the sales process. The Sales Quotation is not covered in this e-learning.
The Sales Order is a commitment from customer or lead to buy - at agreed - to quantity and price - a product or service from you.
The Delivery include that the shipment of goods has occurred.
The A/R/ Invoice is the only document that must created in the sales process. It is the request for payment and records the revenue in the Profit and Loss statement.
The Incoming Payment receives the payment from the customer and clears the [411] Customer Account.
Internal reconciliation takes place automatically.
Business Partners used in sales process:
- Leads (Use on pre-sales documents or Sales Order; Not on Deliveries or
Invoices)
- Customers (Use on any sales document; Covert leads to customers when they buy)
Defaults are set the company level for Business Partner details such as:
- Currency
- Payment terms
- Credit Limit
- Price List
Every document in the sales process must have a business partner assigned.
You can begin the process with the Business Partner Master type: lead. A lead describes people and organizations in the sales pipeline - your potential customers. Lead Master Data record are used as the foundation for sales and marketing. After you make the first sale to a lead, you change the Business Partner type to customer, turning the lead into customer.
A Sales Order can have either a Lead or a Customer assigned. Once you move to a Delivery, you must have a customer.
Customer Master Data describes people and organizations to whom your company sells products and services. Customer Master Data records are used the foundation for documents related to processing and fulfilling orders for customers and for the wizard for dunning customers.
We just mentioned leads and customers, but there is also another type of Master Data, the vendor master, which is not used in the sales process. Rather it is used in purchasing. The reason I mention it here is that there is a great deal of similarity between the data for all three types of Master Data records. Therefore SAP Business One uses windows with a common structure for all three Master Data types.
Before you begin entering Business Partners, you set defaults for Business Partners in the company settings. These defaults are then copied into each newly created Business Partner. For example, the currency defaults to the company's local currency and Payment Terms are set the company's default Payment Terms.
Payment terms are very important and contain more than just due date calculation and discount for early payment. Credit limits and price lists are also set in the Payment Terms definitions. Of course, all these defaults can be changed in the Master Data record, and even in sales documents.
Leads
● Use on pre-sales documents or sales orders
● Not on Deliveries or Invoices
When you identify a potential customer, you can create a Lead Master Data record using the Business Partner Master Data window. This enables you to document and track the presales activities with this lead.
You can create the following documents for Lead Master Data
record: Sales Quotation, Sales Order, Sales Opportunity, and Activity.
Leads
cannot be used on Deliveries or Invoices.
Once you assign a lead to sales documents, the lead cannot be deleted, even if the deal does not go through.
When the lead takes the next step and buys a product or
service, the lead become a customer.
In this case, all you have to do is to
change the type of the Business Partner Master record from lead to customer.
All
the information you have added to the Lead Master Data record is saved, as well
as the documents you created for this lead. For example, if you created a Sales
Order for a Lead, once the lead become a customer and buys the items in the
Sales Order, you can use the Sales Order as the basis for creating a Delivery
document and later on an invoice.
Because SAP Business One automates so much of the Sales-A/R process, it is essential that you select or enter the correct customer and item data when you initiate a Sales Order. For example, things as simple as a customer's ship-to and bill-to addresses, if entered inaccurately or incompletely, can have a huge impact on your company's bottom line when goods ordered shows up where they are not supposed to or invoices are sent to the wrong office.
Additionally, in some localization such as the Unites States, the tax code and rate is determined based on the ship-to assignment. So make sure you select the appropriate ship to address from the drop down list, rather than updating the address manually.
Then I will create a lead and convert it to a customer master.
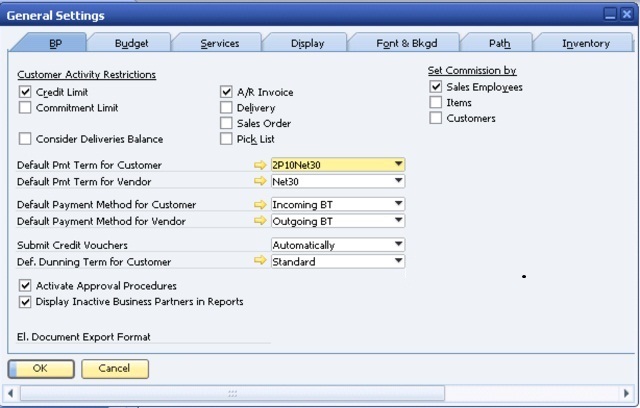
Before I create a new Business Partner Master record, I review my defaults for my Business Partners in the sales process.
You can set default for Business Partners in the menu path:
Administration > System Initialization > General Settings > BP tab.
There are several settings here. I will just point out a few useful settings. One useful setting is to turn on credit limit checking for Business Partners in documents. Here you can see we have activated credit limit checks for the A/R Invoice. Once the check is active, a warning message will appear when the customer's account balance plus the amount of the document exceed the customer's credit line.
Next you will see a section where you can set values that will default into a newly created Business Partner Master.
You can set default Payment Terms and Payment Methods for customer masters and vendor masters.
The details behind the Payment Terms, Payment Methods and dunning terms are defined in the menu area for set up for Business Partners.
Administration > Setup > Business Partners.
Besides setting up the details for payment and dunning, there are several other transactions to set up defaults for your customers. You can also adjust the address format used in the Business Partner Master.
You can set up groups and create properties used to organize your customers for reporting and pricing. We have decided that we would like to have a group to give special pricing for our customers who are schools. I will create a customer group for that purpose. I choose Customer Groups. I enter Schools. Choose Update. Then choose OK to close the window.
Now we will look at setting up a Business Partner.
Business Partners > Business Partner Master Data. Change Add mode.
Choose the Addresses tab page. To enter the bill-to address, choose Define New (under Bill to).
To enter the ship-to address, choose Define New (under ship to). Choose Add to save the data record. Choose Add to save the data record.
Later Company contacts me to order some printers, so I will convert the lead to a customer.
Let's assume that Hillsdale School has just called us inquiring about purchasing computer equipments. I will set the school up as a lead.
Business Partners > Business Partner Master Data.
Change to search mode and
search for lead. Enter the code value in the Code field and choose Find.
Choose the Address tab page. To enter the bill-to address,
choose Define New (under Bill to).
To enter the ship-to address, choose Define New (under Ship to). Choose Add to
save the data record.
Later Hillsdale School contacts me to order some printers, so I will convert the lead to a customer.
I change the Business Partner Type to
Customer and adjust the lead's code to conform to our naming conventions for
customers.
Note that this change could also have been made at a later point in the process
after I create the Sales Order document.
I save the changes by choosing Update. The OK.
- Items represent products to be sold
- Items can be for either goods or services
- Item information is stored in the Item Master Record
Besides the Business Partner, another key piece of data entered in the Sales Order is item data.
Items represent products to be sold: either goods or service. Like Customer Master Data, item information is stored in Master Data records.
Services you sell can also be setup as Item Master Data
records. If the services defined as items they can be entered into Sales Order
along with physical items.
Alternatively, you can use the Item/Service type field to
switch to a service type document. where descriptions of service can be entered
along with prices.
Price List basics:
- 10 default Price Lists are provides
- Items are linked to every prince list
- Assign a Price List to each customer
- The assigned Price List defaults into a sales document automatically
Price List > Customer Master Record > Sales Document
When you enter an item into a sales document, a price is automatically found. How does this work?
Company provides 10 default Price Lists. Items are linked to
every Price List. You then set up prices for each Price List.
Of course, you do
not have to use all ten Price Lists, but they are provided to you so that you
can offer different prices to different group of customers.
You assign a price
list to each customer via default Payment Terms.
Of course, the Price List can be changed in the customer master. When you enter the customer in a sales document, the assigned Price List defaults to the sales document automatically. The system will then use that Price List to price items in the order.
Of course, more complex pricing can be used such as Special prices, Discount groups, and Pricing hierarchies.
Prices can also be changed in the Sales Order by authorized users. For example, a salesperson might give a 5% discount to a particular item or to whole Sales Order.
The Sales Order is an important document - it tells everyone to get busy filling that order. As such, this document is important for planing production, creating Purchase Orders, and scheduling resources.
One unique feature of SAP Business One is that you can create Purchase Orders directly from Sales Orders, thereby streamlining your supply chain as well as Material Requirements Planing process.
You can change a Sales Order (changing quantities, updating prices or discounts, and so on) after have posted it. This is possible as long as you have made the appropriate setting in Document settings and there are no deliveries or invoice documents which reference the Sales Order.
A Sales Order can be based on one or more Sales Quotations.
A Sales Order affects the available stock level. This means that the stock available to sell is reduced by the quantity in the order.
When you enter Sales Orders, no value-based changes are posted to the general ledger, but the items added to the committed quantity in the inventory module
Let us imagine that our customer orders 5 printers.
Our customer orders 5 printers
We enter customer, items, and quantity in the Sales Order
The system determines the price automatically, based on the customer's assigned Price List.
Sales person offers a discount to the customer, so manual discounter for 1% is
entered in the order
Based on the Payment Terms, the customer is also eligible for an early payment
discount of 2%.
The Open Items report allows the user to view open Sales and Purchasing documents. Use this report to get an accurate picture regarding the status of documents in the system.
Only documents status Open appear in this report.
Documents that were partially copied to target documents are still open and will also appear in this report.
You can choose which document type you would like to view: for example, pull up all open A/R Invoices or all open Sales Orders.
As you view the list, you can drill down into a document on the list to display the document itself.
Hillsdale Schools just called to place an order for five printers. I choose Sales A/R > Sales Order.
A customer [School] has just called to place on order for five
printers. I choose Sales A/R > Sales Order.
The sales person gives a 1% discount to the customer for being
a new customer. The purchaser from the school receive a 2% discount for paying
within 10 days.
In the Accounting tab, I check if the terms are correct. I will review the Payment Terms and adjust if necessary.
To review the details of the Payment Terms, I choose the link
arrow. This will take me to the definition from the setup menu.
Payment terms include the calculation for due date of the
invoice. Also, I can see that this customer will receive a cash discount.
I can view the details for the cash discount assigned to these Payment Terms by choosing the link arrow. Here we can see that if the customer pays 10 days they will receive 2% discount.
I choose Cancel to return the Payment Terms, then cancel again to return to the Sales Order.
Then I choose Add to save the Sales Order.
Now let us take a look at the Sales Order's effect on inventory and accounting. I open the Sales Order I just created using the Last Data Record icon.
To view the details for the row I double-click on Row 1. The warehouse assigned is 01.
Then I choose the link arrow to next to the Item No. field to view the Item Master Record. To see the quantity in stock, I choose the Inventory Data tab.
When Sales Order is added, the quantity is shown as Committed. I choose Cancel to return the Sales Order.
Another useful report to show the effect of the Sales Order is the open items list.
Sales A/R > Sales Reports > Open Items List. Then I choose Sales Orders in the dropdown list for open documents. Here I can see what is currently on all the Sales Orders. I can see my Sales Order and Item. I choose my Sales Order so I can point out other options available in the Sales Order.
The Sales Order contains essential information not just for selling the item, but information that will be used by the Delivery and later by the Invoice.
On the Logistics tab, notice the Ship-to and Bill-to addresses which default directly from the customer master.
The Ship-to will be used as the main address for the Delivery and the Bill-ti will be used as the main address for the Invoice. It is essential that addresses are correct.
That is why they are maintained centrally in the business partner master record to avoid data entry errors.
On the right side of the tab, we see options which will affect what happens after the Sales Order has been added. First we see an option for printing a picking sheet automatically. If this is unchecked, the system will use the print layout for Sales Order.
Below that we see an option to create a Purchase Order automatically when the Sales Order is saved. This can be very useful if you do keep a lot of stock on hand, but prefer to order the items from a vendor when a customer requests them.
The Approved checkbox has been flagged in our system. However,
this checkbox can be used to require Approval before a Sales Order is fulfilled.
In the System Initialization document settings you can choose whether this box
is checked by default or not:
Administration > System Initialization > Document Settings > Per Documents:
Sales Order Approved / Activate Automatic Availability Check
The next checkbox is "Allow Partial Delivery". Generally, customers like to receive the items as soon as possible, even if only a partial order can be Delivered. However, sometimes a customer may prefer to have only the full quantity delivered. In that case, you can unmark this checkbox to disallow a Delivery to be created for anything less than a full delivery. In those cases, you can pick a partial delivery, but a Delivery cannot be created until the full Quantity is available.
You control whether partial delivery is allowed for a customer in the Business Partner Master Data.
This is done on the tab for Payment Terms. Of course, as I mentioned, you can override this the Sales Order as need.
A Delivery indicates that goods have been shipped. This document is also sometimes referred to as packing slip or Delivery mode.
You can create Delivery from a Sales Order or Sales Quotation. To do so, simply the Sales Order or quotation and select Delivery from Copy To button's drop-down list.
If you have multiple Sales Order to be delivered to one Customer, you can open a blank Delivery, add the customer name, the use Copy From to select from a list of Sales Orders and Quotations for that customer.
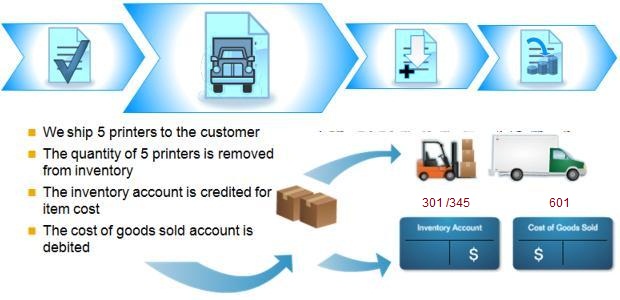
Adding a Delivery reduces the actual Inventory levels. When you post a Delivery, the corresponding Goods Issue is also posted. The goods leave the warehouse, inventory quantities are reduced, an, if you are running Perpetual Inventory, the relevant inventory changes are posted to accounting.
If the Delivery is based on a Sales Order, the Committed quantity from that order will also be reduced.
In our business example, our customer has ordered 5 printers. When it is time, we ship 5 printers to the customer.
The quantity of 5 printers is removed from inventory.
[301] The Inventory Account is
Credited for item cost.
[601] The Cost of Goods
Sold is Debited.

If you are using Perpetual Inventory, the system creates automat a Journal Entry.
The Journal Entry posts the value of the current item cost to the debit side of a Cost Account (such as [601s] Cost of Goods Sold) and to the Credit side of the Stock Account. The stoc account and the Cost Account are retrieved from the Stock Account field and the Cost Account filed on the Inventory tab of the Item Master Record.
The stock quantity is affected whether or not you are using Perpetual Inventory.
Once a Delivery is added to the system, it cannot be modified.
We will deliver items from our Sales Order.
The printers are ready for Delivery, so I create a Delivery with reference to my Sales Order. I choose the button Copy to. Then I choose Delivery. I choose Add to save the Delivery and confirm the system message by choosing Yes.
Let us take a look at the effect of the Delivery on Inventory. I re-open the Delivery I just created to view the effect of the Delivery on Inventory. To see the effect on inventory, I open the Item Master Record by choosing the link arrow next to the Item No. field.
On the Inventory Data tab, I can see how many printers are in stock. I can see there are 5 less than before I added the Delivery. Also notice that the Delivery has reduced the Quantity Committed. I choose Cancel to return to the Delivery.
The view the effect of the Delivery on accounting, I choose the Accounting tab to find the Journal Entry. I choose the link arrow next to the Journal Remarks field.
Here we see the postings for the [601s] Cost of Goods Sold and for the reduction in inventory value.
An A/R Invoice is a request for payment. Posting an A/R Invoice records the revenue in the Profit and Loss statement. Once added, the A/R Invoice automatically creates a Journal Entry posting to the corresponding customer and [701] Revenue Accounts.
The A/R Invoice is the only mandatory document in the Sales process. If a business desires a streamline process, all the functions normally handled in the Sales Order and Delivery can also be handled by an invoice.
In our business example, we have delivered 5 printers to our customer. How we bill out customer for printers. The total amount was reduced by a 1% discount that the sales person entered manually. The due date is based on the customer's Payment Terms. These Payment Terms also include a 2% discount for early payment.
When A/R Invoice is added, a Journal Entry is automatically created to record a Credit to [701] Revenue and Debit to the [411] Customer Account.
Posting in Sales Process for Inventory Items

Here we see the two Journal Entries made in Perpetual Inventory system for inventory items.
The Journal Entry from the Delivery records the cost associated with the sale of goods and the reduction in Inventory value. The A/R Invoice records the Debt owed by the customers and the revenue made from the sale.
As I mentioned earlier, the Invoice is the only mandatory document in the sales process and can handle the functions of the Sales Order delivery note.
This means that if you skipped the Delivery before posting the A/R Invoice, the system adds the stock posting to the A/R Invoice posting. In those cases where a Delivery document is not referenced for an A/R Invoice with Inventory items, the A/R Invoice also decreases inventory values and Quantities.
The [301] Inventory account is credited and the [601] Cost of Goods Sold account is debited based on the current cost in addition to the posting to customer and [701] Revenue Accounts.
Of course, this graphic covers only the basic of the accounting transactions.
There may be additional posting for tax or additional revenue and expenses.
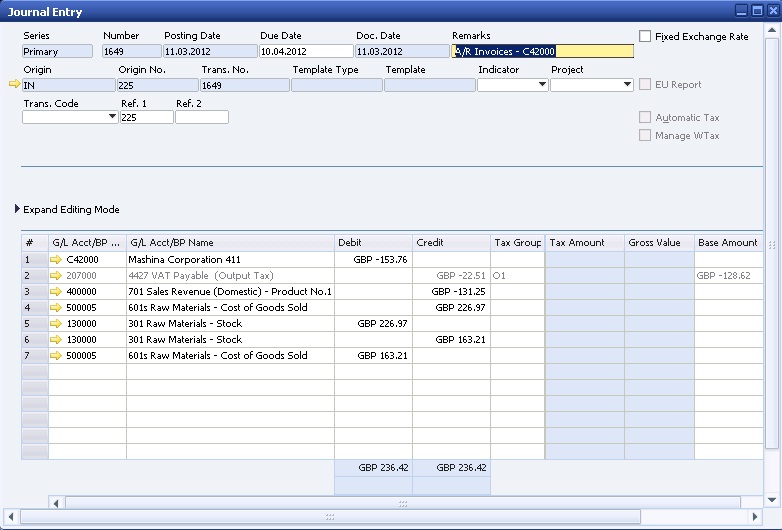
We will create an A/R Invoice from Delivery. From the Delivery, I will copy the items to an A/R Invoice. Here we see the Delivery I just created, once again I can use the Copy to function. I choose A/R Invoice.
We see the manual discount of 1% that I gave the customer. The customer will also receive a 2% discount for early payment. This discount will apply when the payment is posted.
I choose Add to save the invoice. I confirm the system message by choosing Yes. I re-open the invoice I created (with the Last Data Record icon).
I choose the Accounting tab to locate the Journal Entry. I choose the link arrow next to the Journal Remark field to open Journal Entry.
Here I can see a debit posting made to the [411] Customer Account and Credit posting made for [701] Sales Revenue.
Incoming payments are the last step in the basic sales process, even thought they are a function in banking. Posting an incoming payment receives the payment from the customer.
Banking > Incoming Payments. Choose the [411] Customer Account and a list of open invoices will appear. The list also includes any Credit Memos an manual Journal Entries posted to the account.
You can select the invoice to be paid or make the payment to the customer's account.
When you select an invoice with an early payment discount and the payment was received before or on the due date, the total amount owed is reduced by the discount amount.
When a full payment is applied to an invoice, the invoice is closed and will no longer appear on the list when you enter the next payments for this customer.
Customer payments can be processed for bank transfers, checks, credit cards and cash, and in some localization, bill of exchange.
When the Incoming Payment is added, a Journal Entry is made crediting the [411] Customer Account for the payment. Depending on the payment means, an appropriate G/L Account (such as one our [5121] bank accounts) is debited. If there is a early payment discount, a debit is applied to a discount account.
When you create an Incoming Payment to clear (fully or partially) a document or transactions, Internal Reconciliation takes place automatically, meaning that Customer's Invoice and the payment are matched in the system.
Additionally, two other transactions can be used to receive Incoming Payments.
The Payment Wizard can be used to process Incoming Payments as well as process Outgoing Payments.
Payments can also be received automatically from a bank transfer using bank transfer processing in many localizations.
It is also possible to post payment while creating the invoice. To do this, you choose the Payment Means icon when you create an Invoice and enter the payment amount. This will create an Incoming Payment document that is applied to the invoice you just created.
Let us consider the business example. Our customer pays the invoice on time for 5 printers.
The total includes the 1% manual discount and the early payment discount of 2%.
The early payment discount defaults in from the Payment Terms associated with the customer master record.
A Journal Entry is created to record: debits to our house [5121] Bank account, or Clearing depending on the selected Payment Terms, and to cash discount accounts and a credit to the [411] Customer Account.
We will create an Incoming Payment document to process a customer payment.
A customer sent a payment for the delivery using bank transfer. Create an Incoming Payment for the A/R Invoice.
Banking > Incoming Payments > Incoming Payments. Now I see the Incoming Payments window. I enter the Customer Code. Now that I have entered the customer, a list of open invoices appears. The list also include any credit memos and manual Journal Entries posted to the account.
I can select the invoices to be paid or make the payment to the customer's account. I select the A/R Invoice by marking the selection box in the Selected column. If the invoice was partially paid, I can change the Total Payment field, in the invoice row.
Notice how the 2% early payment discount is applied to the total amount.
Then I choose the Payment Means icon. My customer, is paying with a bank transfer, so I choose the tab Bank Transfer. I enter the data.
In Total fields I can press Ctrl + B to bring amount automatically.
I choose OK. I choose Add to save the document. I choose Add again.
Now let us review the Journal Entry created by the incoming payment. I choose the Lst Data Record icon to see the Incoming Payment I just created.
Then I choose the link arrow next to the transaction number. This opens the Journal Entry window.
We see a Debit to our [5121] Bank Account + Customer Discount Payment and Credit to the [411] Customer Account.
That concludes the final step in the Sales A/R process.
Sales to One - Time Customers (A/R Invoice + Payment)
SAP Business One provides the A/R Invoice + Payment transaction for sales to one-time customers. You can use this transaction if the customer pays the entire amount at once (for example, in a shop) and the customer does not need documents such as an order or delivery note document.
The first step is setting up a representative master record
for one-time customers in the system. You create a customer master that will be
used for your one time customers. Then you set this customer number as the
default You choose the menu:
Administration > Setup > Financials > G/L Account Determination. You the choose
Sales tab Page, and enter in a customer number in the Default Customer for A/R
Invoice + Payment field.
When you open A/R Invoice + Payment window, the system automatically calls up this customer. You cannot change the customer number in the document. You can, however, change the customer's name and address in the fields provided.
If you would like to assign a separate customer to each user of this transaction, you can do this using default values in the user parameters.
Remember that when you use a one-time customer, all invoices and payments are associated with the same representative Master Data. All details are inside the document. If you need to keep contact with the one-time customers, you should use a Master Data record for them and a standard invoice and payment.
When you add the A/R Invoice plus payment, the system will ask you to enter in the payment means and the total payment for the sale.
Note that one-time customer master records are used when a customer is buying an item and paying the full amount in the same transaction.
If a customer is only making a partial payment you should create a separate customer master record for this customer so that you can monitor the Incoming Payments.
We will create an A/R Invoice = Payment for One-time customer.
Many customers are customers I see only once. They purchase their goods directly from the warehouse and pay immediately. Rather than creating a customer master for each of these customers, I can use a one-time customer master record.
First let us take a quick look at how the one time customer number is set up in the system.
Administration > Setup > Financials > G/L Account
Determination.
I choose Sales tab, then General sub-tab. Here see the field
Default Customer for A/R Invoice and Payment. Now I will enter a transaction for
my one-time customer.
Sales A/R > A/R Invoice + Payment.

The system automatically propose the customer C9999 that we saw in the setup.
After Add, the system now prompts me to enter customer's payment means to save this transaction. The options available are Check, Bank Transfer, Credit Card and Cash. I save the transaction as a cash payment.
Then I copy the total by choosing the Total field and pressing Ctrl + B. I have finished entering in payment information so I choose OK, to close the Payment Means window. In the A/R Invoice window, I choose Add. Then I confirm the system message.
The impact is the same as a standard invoice and incoming payment. The invoice will record both the inventory transaction and the accounting transaction for inventory, as well as [701] Revenue and [411] Account Receivables.
The Incoming Payment creates a standard Journal Entry as shown before. The invoice and the payment are closed, and reconciled with each other.
Issues in Sales [Time: 26:25 min.]
Welcome to the e-Learning course on handling issues in the sales process.
In this session, we will
explore how to handle issues that arise in the sales process:
- Product unavailability
- Return
- Credits
- Exchanges
We will see the options we have when product is unavailable.
We will process returned items, enter Credit Memos and see how we can use negative rows in a sales documents, to handle partial credits and exchanges.
- The company sets customer satisfaction as top
priority
- If a product is unavailable in our local warehouse, you use the option
available to ship that item or another acceptable item as quickly as possible
- If problems arise in Delivery and billing, you quickly solve the issue by
using documents such as Returns and Credit memos
- Additionally, you use negative rows in sales documents to give credits to
customers for returned packaging materials.
Imagine that Your company sets customer satisfaction as top priority.
Availability in the Sales Order
The item availability
check determines if the item is available:
- With a sufficient quantity for your Sales Orders
- In a particular warehouse associated with your Sales Order row
- By the customer's required delivery date
An item availability check can be set up to be performed automatically in Sales Orders.
If any conditions can not be met, the item availability window opens to alert you.
Administration > System Initialization > Document Settings
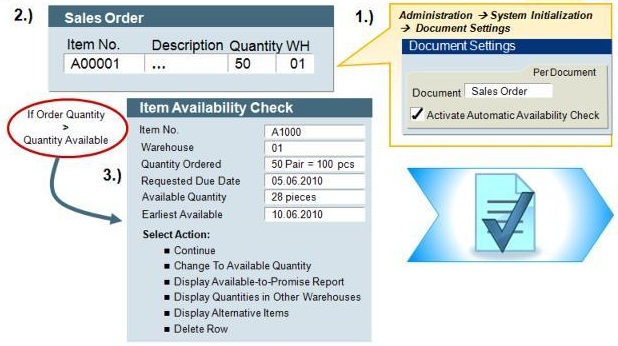
You set up the automatic check for availability in Sales Orders in Document Settings. In the Per document tab, you choose the window for Sales Orders, then you activate automatic availability check by selecting a checkbox.
From that point on, whenever you are creating a Sales Order and enter a quantity for item is greater than available quantity for this item on the delivery date, the Item Availability Check window comes up automatically. Even if you have not activated the automatic availability check for Sales Orders, you can still open the Item Availability Check window by choosing the availability check option in the context menu.
The Item Availability Check window displays the quantity ordered in the Sales Order and quantity available in Inventory.
Several actions are offered in this window.
The first option is to continue. This allows you to accept the information and proceed without changing the Sales Order. In that case item will be backordered.
The second option is to change the quantity in the Sales Order line item to match the Available Quantity. This reduces the order quantity to the available quantity.
If you need more information before deciding on a resolution, you can choose the option to display the Available-to-Promise Report. This provides your with an at-a-glace report on stock inflow and outflow including projections. This report is also available directly from the context menu.
You could also check quantities in other warehouses. From this report, you can check and possibly select the quantities from another warehouse.
Sometimes an item has been set up with alternate items. When you choose this options, you can check for any alternates and if one is available, you can select the quantities from an alternative item.
If the item is not available and no other options remain for on-time delivery, a customer may decide to not order that item.
One of the actions available is to delete the item's row from the Sales Order.
Sometimes, you may see an additional option, Change to Earliest Availability. This option only appears when the availability date can be calculated. It copies the earliest availability date to the row's Delivery date.
In our business example, our customer orders 7 scanners, but unfortunately only 5 current available in the main warehouse.
The item availability window opens automatically giving us several options to pursue. First we check in the items is available right now in other warehouses. Unfortunately, none are available in other warehouses.
Second, we choose the option to review the availability-to-promise report to see if there are any Purchase Orders or Production Orders on the horizon.
Since there are none in the immediate future, we offer to the customer the option of receiving a different scanner witch is set up as an alternate item. The customer prefers that option over waiting.
The customer agrees to receive 5 of the original scanner ordered and 2 of the alternate scanner on their original Delivery date.
We will look at how availability checking works.
A customer has called to say they would like to order fast feed scanner with quantity more available.
I create Sales Order. The Item Availability Check window comes up automatically when I move out quantity field because an insufficient quantity is available for this scanner.
I would like to see how many are in stock in another warehouse so I choose Display Quantities in Other Warehouses from the Availability Check window. Unfortunately, there is nothing in other warehouses for this item, so I choose Cancel.
I decide I need more information about upcoming availability so I choose display Available-to-Promise Report. Here I see that are currently no Purchase Orders or Production Orders for this item. Choose OK to return to the options.
Perhaps there is a similar item that might suit the customer. I choose display alternative Items from the Availability Check window. There 20 pieces of the alternative item A2020 available. The customer agrees that substituting this item would be acceptable so I choose Change To Available quantity from the Available Check window. I add the alternative item (A2020) to the Sales Order with a quantity of 2. Then I update the Sales Order.
Now let us look behind the scenes to see how all of this is set up. First let us take a look at the setup needed for the availability check.
You activate the automatic availability check for Sales Order in the document settings.
Administration > System Initialization > Document Settings:
Per Document tab.
I choose Document Sales Order. Here I can see that the
checkbox for Activate Automatic Availability Check has been selected. The
automatic availability check for Sales Orders is activate in my SAP Business One
system.
Inventory > Item Management > Alternative Items.
See the entry for A2010. The item A2020 is listed as an alternate.
Let us assume a different customer calls and asks for a quantity of 10 of the same fast-feed scanner to be delivered next week.
As before, the availability check window
opens. I choose Continue.
I choose the Logistic tab, and flag the checkbox
"Purchase Orders". (Do not save the order). In 8.8, you save the order and a
Purchase Order confirmation window opens. Beginning in 8.81, a wizard is
available for creating the Purchase Order.
In summary, there are several options for fulfilling customer orders when quantity is low. You can reduce the quantity to the available quantity, choose a different warehouse with more quantity, substitute an alternative item, change the date to the first available date or even crate a Purchase Order directly for that Sales Order.

The two main correction documents for the sales process are the return document and the A/R Credit Memo.
The Return document is used to process items returned from customers following a Delivery.
The A/R Credit memo (or Credit note) is used to process returned items, once an A/R Invoice has been issued. Credit Memo can also be created to give credit amounts not connected to items. Additionally, rows with credits can be entered directly on Deliveries and Invoices.
If a Delivery is damaged or of poor quality, the customer return the items to you. A Return allows you to reverse a Delivery, either or fully.
When you create the Return with reference to the Delivery note, the system corrects the stock posting in the delivery note.
Why would you need to use a Return?
For legal reasons, you cannot change or delete Deliveries and Customer Invoices that already been entered in the system.
To correct these, you need to use a clearing document such as a Return or A/R Credit memo document.
If a Delivery is returned before you create a A/R Invoice for the customer, you can post the Return Delivery in the system.
If an A/R Invoice exists, you cannot use a Return.
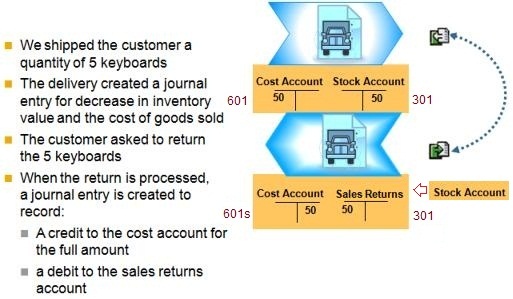
In our business example, the customer Ordered a quantity of 5 keyboards. We shipped the customer a quantity of 5.
Because we were using Perpetual Inventory, the Delivery created a Journal Entry for a Credit to the [301] Stock Account for the decrease in inventory value and Debit to the Cost Account to record the [601s] Cost of Goods Sold.
The customer asked to return the 5 keyboards.
When the Return is processed, a Journal
Entry is created to record:
A Credit to the [601] Cost Account for the full
amount and
A Debit to the [345] Sales Returns Account [=
Stock Account].
Note that some customers use the regular [345] Stock Account for returns rather than a [345] Sales Returns Account [= Stock Account] because they do not need to separate returned items from the general stock.
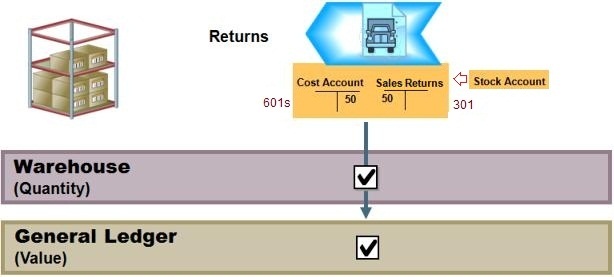
When you add a Return document, the Return document increases the quantity in the warehouse by the quantity of the returned item.
The system also creates a Journal Entry that posts the value of the returned goods to the default side of a [345] Sales Returns Account [= Stock Account] and to the credit side of the [601] Cost Account.
The value of the returned goods is not posted back to the original [345] Stock Account in order to keep it separate from the value of the undamaged goods.
The [345] Sales Returns Account [= Stock Account] and the [601] Cost Account are retrieved from the Sales Returns fields and the Cost Account field on the Inventory tab of the Item Master Record.
Here is a tip: If you also want to manage the inventory of the damaged goods separately from the undamaged goods, you should define a special warehouse for the damaged goods and enter this warehouse in the return document.
I will create a Return for Delivery that has not yet been invoiced.
My customer called to say that is unhappy with the quality of the keyboards he received so he would like to return the quantity of 5 that they received.
First I will search for the original Delivery.
I know it was a Delivery for Maschina Corporation created earlier today, so will search by Customer Code an today's date.
I see the item C00009 on the Delivery note with a quantity of 5. I choose Copy to. Then I choose Return.
I tell the customer to send in the items referencing the document number for the Returns document. In the Remarks field, I enter a note about why the customer is returning the items. Save the Return document by choosing Add. Confirm the system message with Yes.
Let us look at the Journal Entry for the Return.
In many cases, a customer may want a redelivery of the original item especially if the reason for the return was damaged goods.
Starting with SAP Business One release 8.81, when you create a Return or Credit Memo, based on delivery that originated from Sales Order, you can choose re-open the Sales Order for the quantity that was returned. This way can re-use the Sales Order to create the new Delivery for that item.
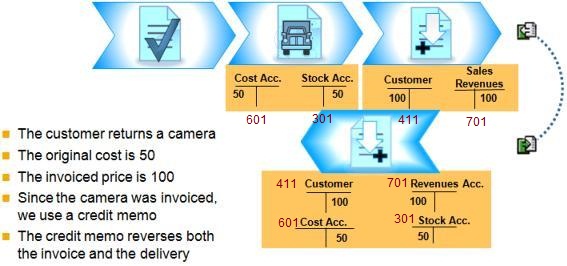
In our business example, the customer is disappointed in the performance of the camera they ordered. So they decided to return the camera.
The A/R Credit Memo reverses both the Invoice posting and the Delivery posting. An A/R Credit Memo (also called a Credit Note) reverses either partially or fully the Journal Entry created by A/R Invoice.
When you create an A/R Credit Memo with reference to the A/R Invoice, the system corrects both the quantities and values in the A/R Invoice. The system increases stocks of the credited items. The system credits the credit memo value to the customer's account in the General Ledger and corrects the revenue by the same amount. If the Credit Memo is for inventory items, the Journal Entry for the Credit Memo will also increase the [345] Stock Account and decrease the [601] Cost Account.

When a customer return items that do not refer to a specific delivery, you can post this quantity directly to the warehouse without referencing a preceding document. If the Credit Memo is for inventory items, then the stock and stock value increase as a result.
I will create a Credit Memo based on an A/R Invoice.
Some time ago, I shipped a several items to a customer and then invoiced them.
Today, I discover that the customer is displeased with how a keyboard is working because they have shipped it back with a note explaining their issues.
I will create a Credit Memo to return the item, since it is no longer possible to create a Return document once the invoice is created.
I enter the customer. I choose Copy from. I choose A/R Invoices. I choose the A/R Invoice I just created form the list.
I the Draw Document Wizard, I select Customize. The I choose Next.
I choose the line item with the keyboard and change the quantity to 1. Then choose Finish.
In the Remarks field, I add a note about why the customer returned the items.
I save the Credit Memo document by choosing Add and then confirm the system message.
In our business example, our customer has ordered 5 batteries. The customer quickly realizes that the batteries are the wrong kind. The customer would like to exchange the incorrect batteries for the correct batteries.
We can create a sales document, such as an A/R Invoice to ship out the correct batteries. The same document can include a negative row (or credit row) to receive the returned batteries into stock an credit the customer.
Negative rows are a new feature since release 8.8 Negative rows allow to give credits directly on sales or purchasing documents. Using negative rows you can make corrections directly in a marketing document without a using separate Credit Memo.
The sales document enabled for negative rows are: A/R
Invoice, A/R Credit Memo, Delivery and Returns.
The purchasing document enabled for negative rows are: A/P Invoice, A/P Credit
Memo, Good Receipt PO and Goods Returns.
On most sales documents, like Delivery or A/R Invoice, the negative row is a credit. However a negative row added to an A/R Credit Memo will actually be a Debit line which charges the customer rather than Credits the customer. That if because a positive total on Credit Memo indicates a credit, therefore a negative amount on an A/R Credit Memo will indicate that the customer owes us.
Another good example of as use for a negative rows is to give a customer credit for returning packaging while they are ordering more items.
In most localization, you can have a document with a negative amount. This can useful in case the amount on the credit rows exceeds the amount on the debit rows in an A/R Invoice.
I will create an Invoice with negative rows to process an exchange for a customer.
The customer has realized that they need a different type of battery. They would like to exchange the item 100005 for item 100006. It makes sense to use an A/R Invoice to do the exchange because I can enter for positive and negative rows in the same document.
Sale A/R > A/R Invoice. The I enter in The original invoice number of the document (238) as the customer reference number so that I can track the relationship between the documents. I enter in today's date the due date. Then I enter in the two items and the quantities. I add remark customer is exchange batteries from invoice (number I created).
When I save the invoice, the inventory will be update along with the accounting system. The inventory for the first item will be increased by quantity of 5 and then inventory for the second item will be reduced by quantity of 5.
Then I save the A/R Invoice by choosing Add. I confirm the system message.
When I reopen the invoice, I can view the Journal Entry.
I see the entries for the return of the first item and the entries for the issue out for the second item.